Deals with most of the functionality under the Data menu
Defining Sections in JunoViewer Web
|
Fritz Jooste Administrator Posts: 81
6/27/2015
|
Fritz JoosteAdministrator Posts: 81
Defining sections in JunoViewer Web can be found in the Manage menu.
When you create the list of sections for a specific network, it is important to understand how the values you assign to the two filter levels "sectionLabel1" and "sectionLabel2" affect JunoViewer Web.
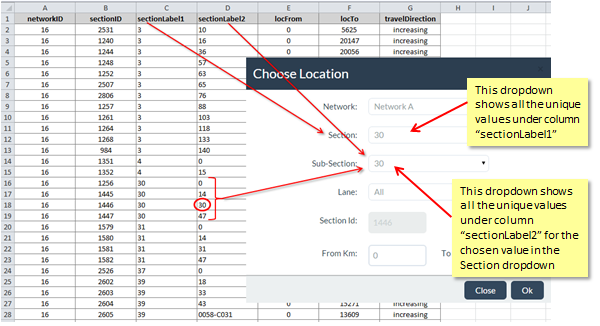
To define sections for a network, you need to complete and then upload the template shown below. In the figure below, we have also shown a typical pop-up window as you will frequently encounter when you are working with JunoViewer Web (for example, when selecting a segment to generate a report for).

As you can see from this figure, the values you put into the "sectionLabel1" column determine the list of values shown in the first dropdown after network selection. The values in "sectionLabel2" are shown in the second dropdown after network selection.
Note that the values you show in the "sectionLabel1" and "sectionLabel2" columns can be completely arbitrary - they are simply a means to arrive at a unique sectionID, which is what JunoViewer uses to perform data queries. However, you must ensure that the combination of "sectionLabel1" and "sectionLabel2" is unique within your database, so that this combination points to a unique sectionID.
You should choose the values for "sectionLabel1" and "sectionLabel2" in a way that the number items in each dropdown is not too much, otherwise selecting a specific section can be difficult. For example, if your network has 2000 sections (e.g. an urban network with lots of residential streets), then it is not a good idea to list all your road names under sectionLabel1. If you do this, you will have to scroll down all the way over 2000 items to select the section you are interested in.
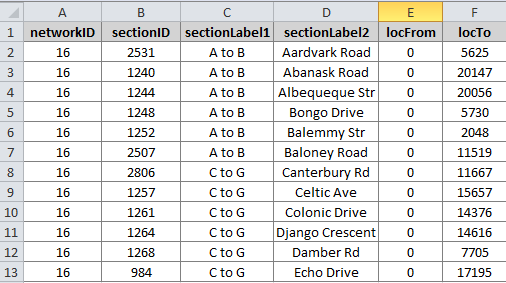
A better way to handle many sections within a network would be to split up the roads like this:

As you can see, the roads have been divided into alphabetical groups such as "A to B", "C to G", etc. Using a scheme such as this one, if you want to select "Celtic Drive", you have to select item "C to G" from the first dropdown (labeled "Section"), the second dropdown will then only display the roads within the "C to G" group, which should be a much more limited selection, making it easier to quickly select the correct road.
A few key checks to perform before updating your Section Definitions:
Make sure you have the right network selected on the Section Definitions page before importing sections, otherwise you will replace section definitions for the wrong network!
- Ensure your location start and end values ("locFrom" and "locTo" columns) are in METRES, and are accurate
- Ensure your sectionID's are integers and that they are unique across all networks
- Ensure that the combination of "sectionLabel1" and "sectionLabel2" is unique within the section definition list.
edited by Thomas on 29/09/2022
edited by Rashel on 9/30/2022
|
|
|
0
link
|
