Adding, viewing, updating, deleting, and exporting data tables and their data within your JunoViewer database.
4. Data Import Template
|
Philip van der Wel Administrator Posts: 145
8/7/2020
|
Philip van der WelAdministrator Posts: 145
This post is part of a series of posts titled Your Data in Your Database, guiding you through adding, viewing, updating, deleting, and exporting data tables and their data within your JunoViewer database. Click here to view an overview of the series.
This help post will provide details on downloading, populating, and uploading a Data Import template. We will also look at the optional Column Mapping functionality.
4.1 Data Import Template
The first step in adding data to a table in your database is to download a Data Import template from the Templates page (under the Data menu) for the table into which you want to import data.

Once the template for your table is downloaded to your computer, you can populate your data into the respective columns. If the data to be imported is in Excel you may be able to bypass the Import template and simply update or add a few columns in order for it to align with your import template.
Notes:
- When a table is added to your database via the Add Table page, a Data Import template is automatically available for you to download.
- We recommend using the data format dd-mmm-yyyy (e.g. 20-Jun-2022). Other formats are available to select during import, however dd-mmm-yyyy is the most unambiguous.
- If you are unfamiliar with your Network ID and Section IDs, you check your network and section definition data on the Network and Section pages under the Data menu. You may need to download your section definitions and create a VLOOKUP in your Import Template to join your Section IDs.
- Uploading your import template to JunoViewer does not add the data into your database, but only uploads the Excel file onto the JunoViewer server, ready for the data to be imported into the respective table.
After populating your template you can upload it to JunoViewer, ready for import. There are 2 ways in which you can upload data to JunoViewer as shown in the image below:

4.2 Column Mapping Template
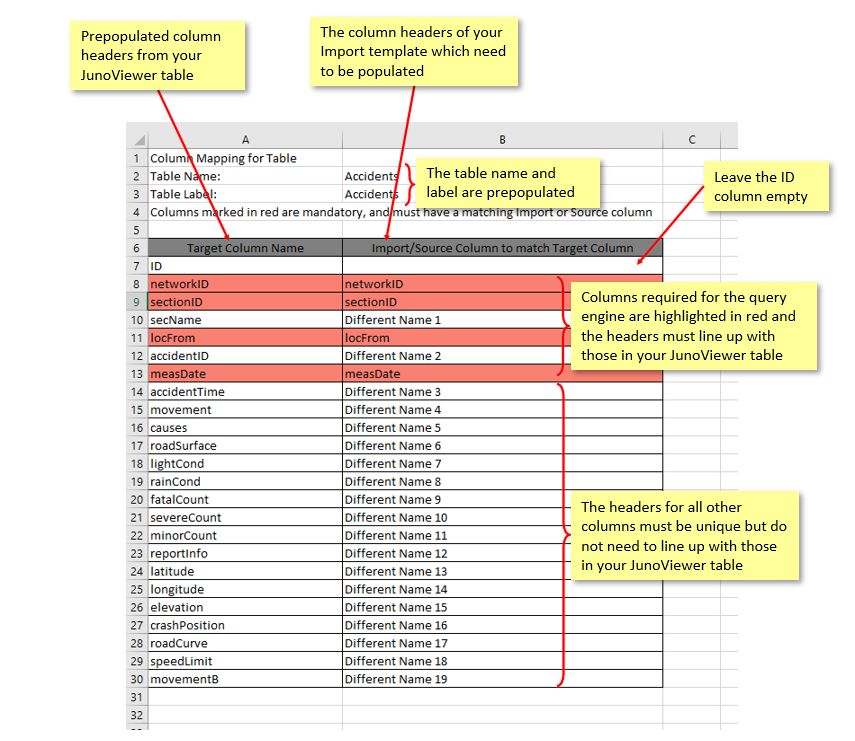
A Column Mapping template, also available on the Templates page (as per the first image above) can be used when importing of data where the column headers in your Import template do not match the column headers in the JunoViewer table. This functionality can be used, for example, where you are extracting data from an external database for import into your JunoViewer database and do not wish to update the column headers.

After populating your mapping template, you can upload it to JunoViewer (see second image above), ready for import.
edited by Kiki on 9/5/2022
|
|
|
0
link
|
