|
Philip van der Wel Administrator Posts: 145
8/7/2020
|
Philip van der WelAdministrator Posts: 145
This post is part of a series of posts titled Your Data in Your Database, guiding you through adding, viewing, updating, deleting, and exporting data tables and their data within your JunoViewer database. Click here to view an overview of the series.
The first step in setting up your data table in JunoViewer is defining your table, which is done in the Table Definition template. The template is where you can define your:
- Column names
- Column labels
- Column data types, and
- Whether to allow null values in the column
The following points will guide you through the process of downloading, populating, and uploading your Table Definition template into JunoViewer.
1.1 Download your template
The template is available for download from the Templates page or the Add Table page (both located under the Data menu).
1.2 Populate your template
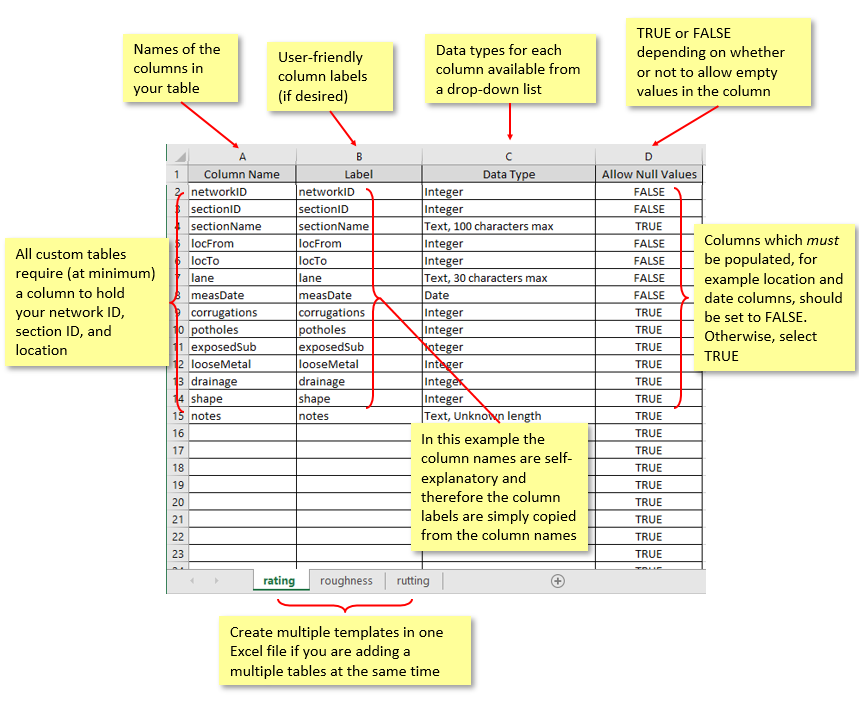
Before populating your Table Definition template, you will need to consider the attributes of your data you want to store in JunoViewer. The image and details below highlight the requirements of the template:

Column Name
- Your column names must be a single word with a maximum of 50 characters and cannot contain special characters.
- For names with multiple words, we recommend using camelCase, however you can also separate using an underscore (not_camel_case or Not_Camel_Case).
- We recommend avoiding column names that may contain SQL reserved words such as Start, End, Year, Date, and Value. In these instances, rather use, for example, locFrom, locTo, surveyYear, measDate, and conditionValue respectively.
- The name 'ID' is a reserved column name and cannot be used. When your table is added, JunoViewer will automatically create an ID column containing an auto-number to track individual rows.
- All custom tables in JunoViewer require (at minimum) columns for your Network ID, Section ID and Location (one location for point data and two locations, a start and end, for linear data).
- A measurement date and direction (and/or lane for roads) are other important columns, depending on the nature of the data.
Label
- The label should be an easily recognisable user-friendly, label for the column which will be visible in selection lists throughout JunoViewer. Alternatively, as in the image above, you can simply copy and paste your column names.
- Labels can contain spaces, but must be 50 characters maximum and cannot contain any special characters
Data Type
- Select the appropriate data type for the column from the drop-down list
- Double-check the selected data types are correct and match the type of data you will be adding to the respective column table
- For text columns, choose the minimum length required to store available data. Only use "Text, Unknown length" when the column will hold very long text values, for example, for a user-defined notes or comments column.
Allow Null Values
- The Allow Null Values column determines whether or not the column can contain empty (null) values. If FALSE is selected, all data added to this table must have values in this column, otherwise the import will fail. If you are unsure, select TRUE.
- Ensure that required columns (at minimum, your Network ID, Section ID, and location columns) are set to FALSE. Other essential columns should also be set to FALSE as the integrity of the record depends on it. For example, if you are collecting maintenance activity it is imperative to understand when a specific maintenance was carried out.
- If there is a possibility the data in a column may be empty, set Allow Null Values to TRUE. If it is set to FALSE and the column does indeed contain empty values, your data import will fail when adding data.
- In summary, only set Allow Null Values to FALSE for required and essential columns.
Other Notes:
- You can create multiple templates in one Excel file. If you are doing this, you need to name the worksheet so that you can easily select the correct sheet when you create the table.
1.3 Upload your Template
Once your template is populated you can upload it to JunoViewer, ready for import. The image below highlights how to upload your template file to JunoViewer:
Click on the Profile Icon highlighted and on Upload a File

edited by Kiki on 9/1/2022
|